How-To Guide
8 min read

How to Import Bank Statement to Xero (2026 Guide)

After converting your data with one of our tools, follow these steps to import the bank statement into Xero.

Import Steps

1

Navigate to Bank Accounts

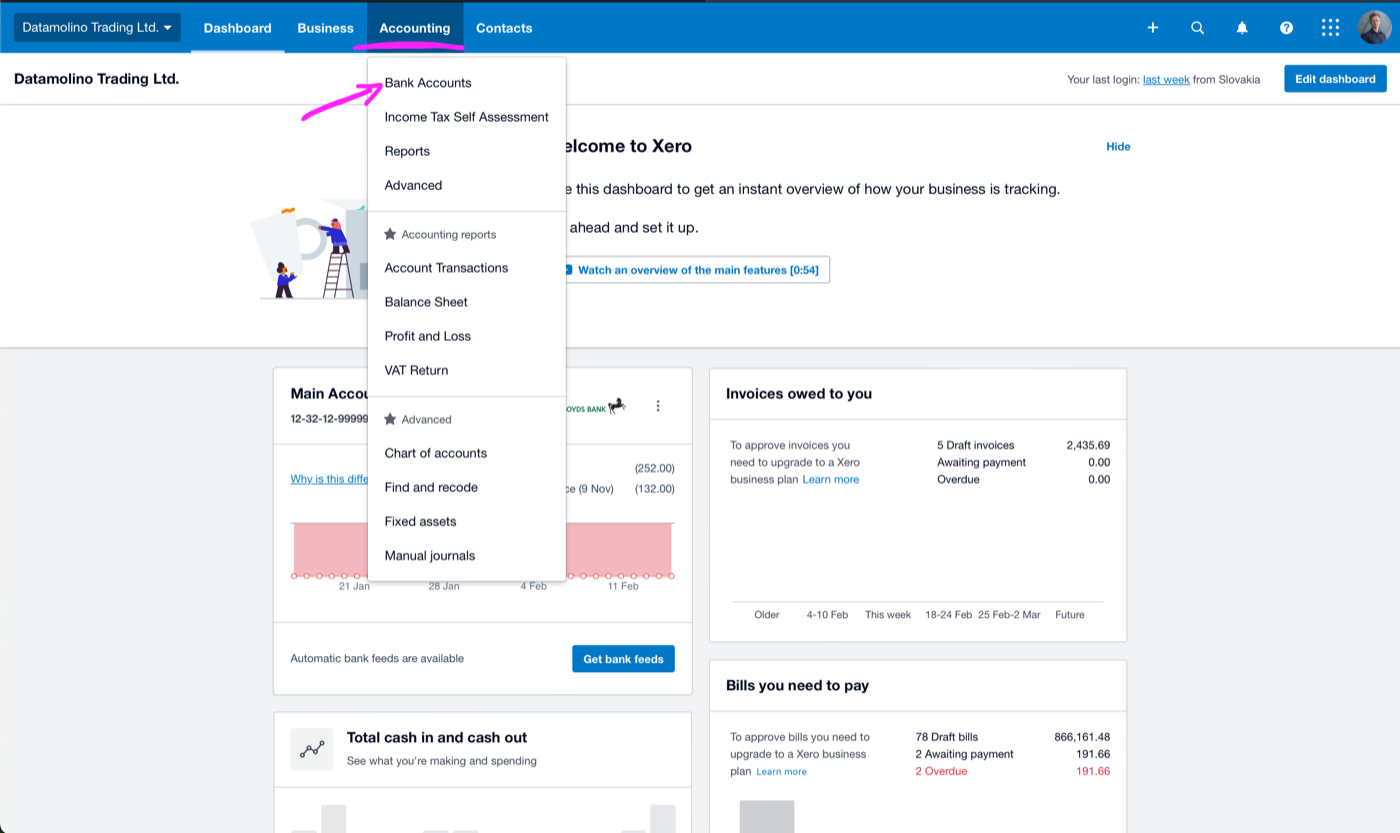
Log in to your Xero account and click Accounting in the top navigation menu. Select Bank Accounts from the dropdown to see all your connected bank accounts and their current balances.

Xero dashboard with Accounting menu expanded showing Bank Accounts, Reports, and Advanced options in the dropdown
Click Accounting in the top navigation bar and select Bank Accounts from the dropdown menu.
2

Select the target bank account

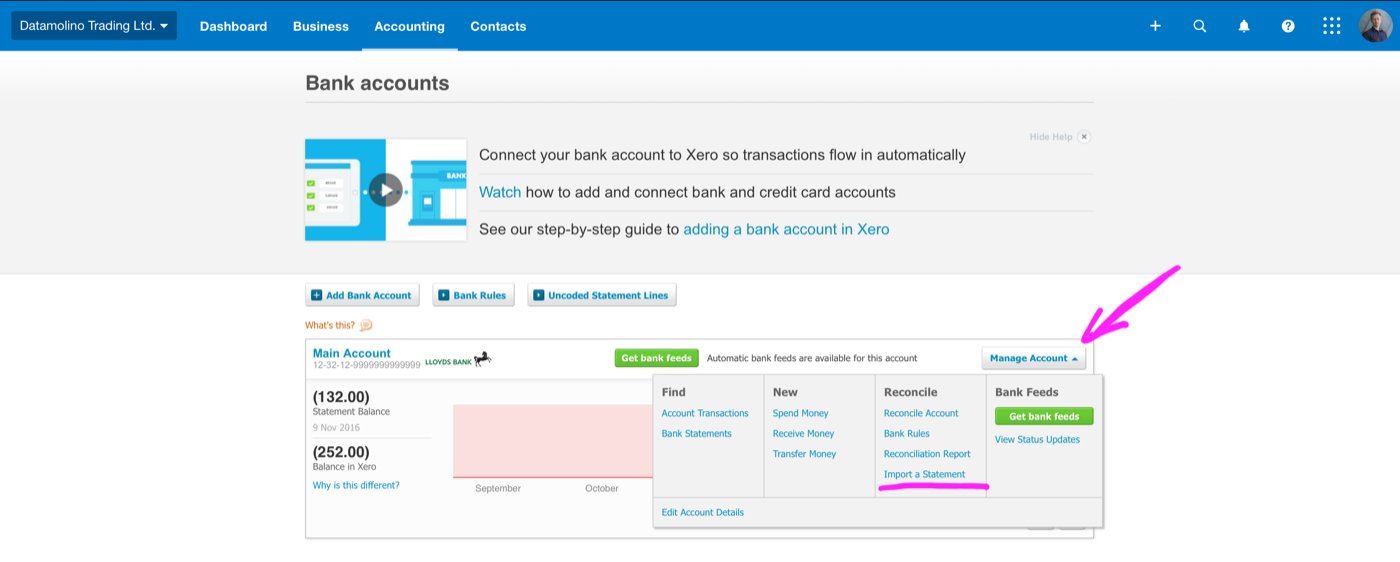
Find the bank account you want to import transactions into. Click on the account name or click the Manage Account button next to it. Then select Import a Statement from the options. This opens the bank statement import wizard for that specific account.

Warning: Make sure you select the correct bank account. Importing transactions to the wrong account will create reconciliation problems that need manual correction.
Xero Bank Accounts page showing a bank account with the Manage Account dropdown expanded, highlighting the Import a Statement option under the Reconcile column
Click Manage Account on the target bank account, then select Import a Statement.
3

Prepare your CSV file

Your CSV file needs at minimum a Date column and an Amount column. Positive amounts represent money received (deposits), while negative amounts represent money paid out (withdrawals). You can optionally include Payee, Description, Reference, and ChequeNumber columns for richer transaction data.

Tip: For precoded bank statements, include AccountCode, TaxType, and ContactName columns to enable automatic categorization and faster reconciliation.
4

Check date format and encoding

Ensure dates in your CSV match your Xero region setting. US organizations use MM/DD/YYYY format, while UK, Australia, and New Zealand use DD/MM/YYYY. The file must be UTF-8 encoded. Check your region under Settings > General Settings if you are unsure which date format your Xero organization expects.

Warning: Date format mismatch is the most common import error. If your dates are in the wrong format, Xero may misinterpret them (e.g., treating 03/04/2026 as March 4 instead of April 3).
5

Upload the CSV file

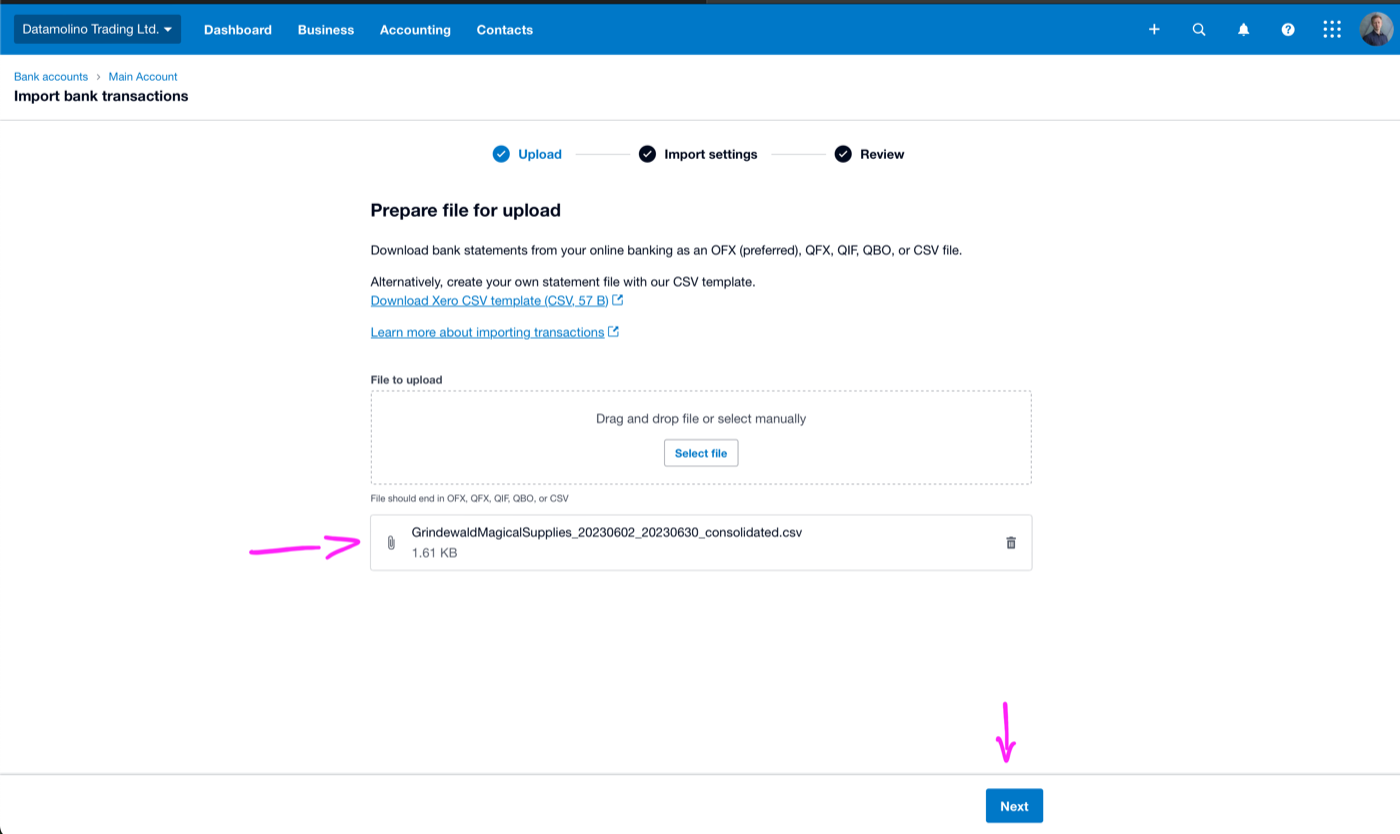
In the import wizard, click Browse or Select File to choose your saved CSV file from your computer. Click Next to proceed. Xero will read the file and attempt to automatically detect and map the columns.

Xero Import bank transactions wizard showing the Upload step with a Prepare file for upload section, Select file button, Download Xero CSV template link, and a CSV file selected for upload with a Next button
The upload step of the import wizard with a CSV file selected and ready to proceed.
6

Review column mapping

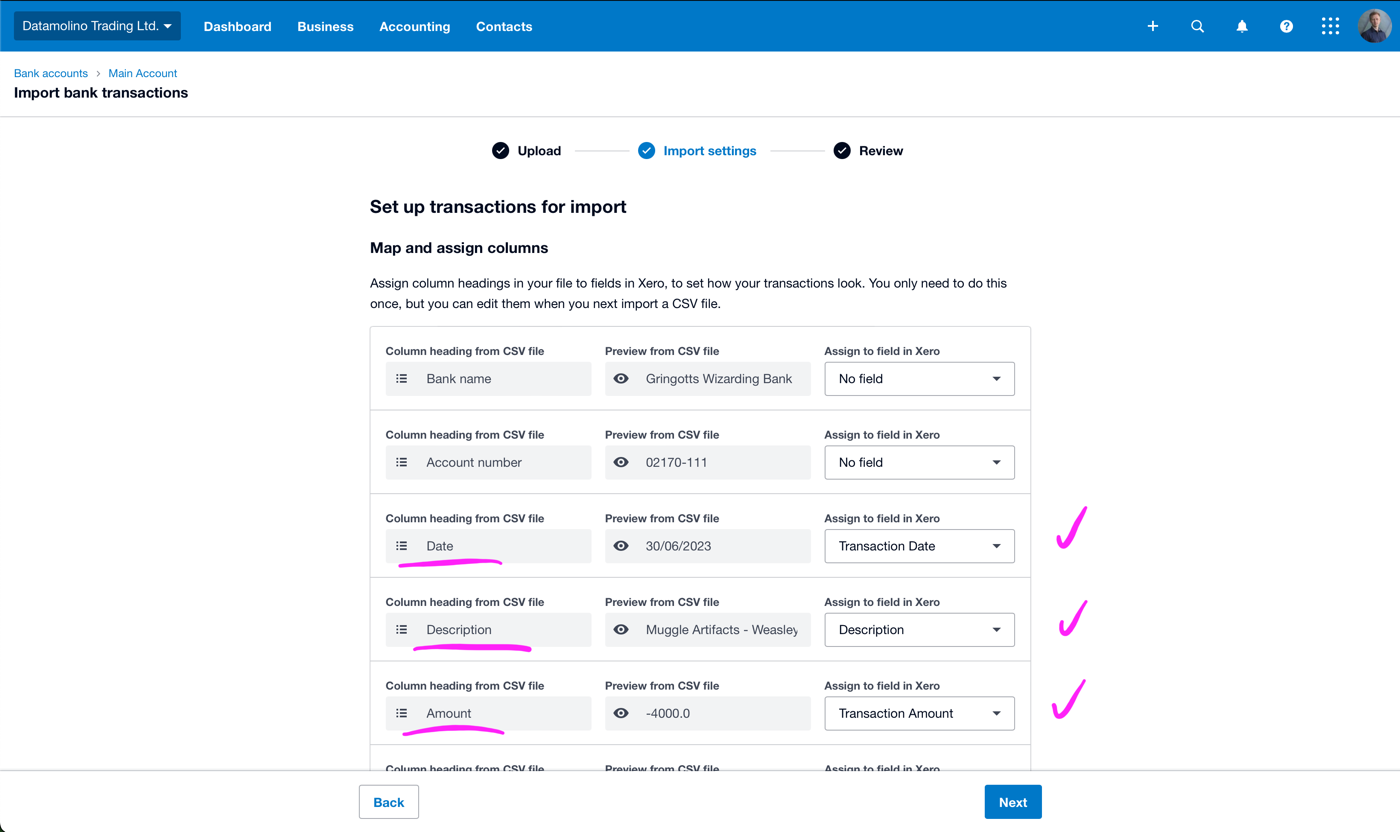
Xero displays a preview of your data with the detected column mappings. Verify that the Date, Amount, Payee, and Description columns are correctly identified. If Xero misidentifies any columns, use the dropdown menus to manually reassign them. Xero remembers your column mapping for future imports from the same source.

Tip: Xero saves your column mapping preferences. If you import from the same source regularly, subsequent imports will map columns automatically.
Xero Import Settings step showing Map and assign columns interface with CSV column headings on the left, preview data in the middle, and Assign to field in Xero dropdowns on the right for Date, Description, Amount, and other fields
Map each CSV column to the corresponding Xero field using the dropdown menus on the right.
7

Preview transactions and complete import

Review the transaction preview to confirm the data looks correct. Check that amounts have the right sign (positive for deposits, negative for payments) and that dates are parsed correctly. Click Import to finalize. Xero processes the file and adds the transactions to the selected bank account.

Warning: Xero allows a maximum of 1,000 transactions per CSV file. If you have more, split your file into multiple batches.
Xero Review and complete import screen showing a Summary of transactions with 17 transactions ready to import, a Ready to import checklist with Date, Description, Transaction type, and Transaction amount columns, and a Complete import button
Review the transaction summary and click Complete import to finalize the bank statement upload.
8

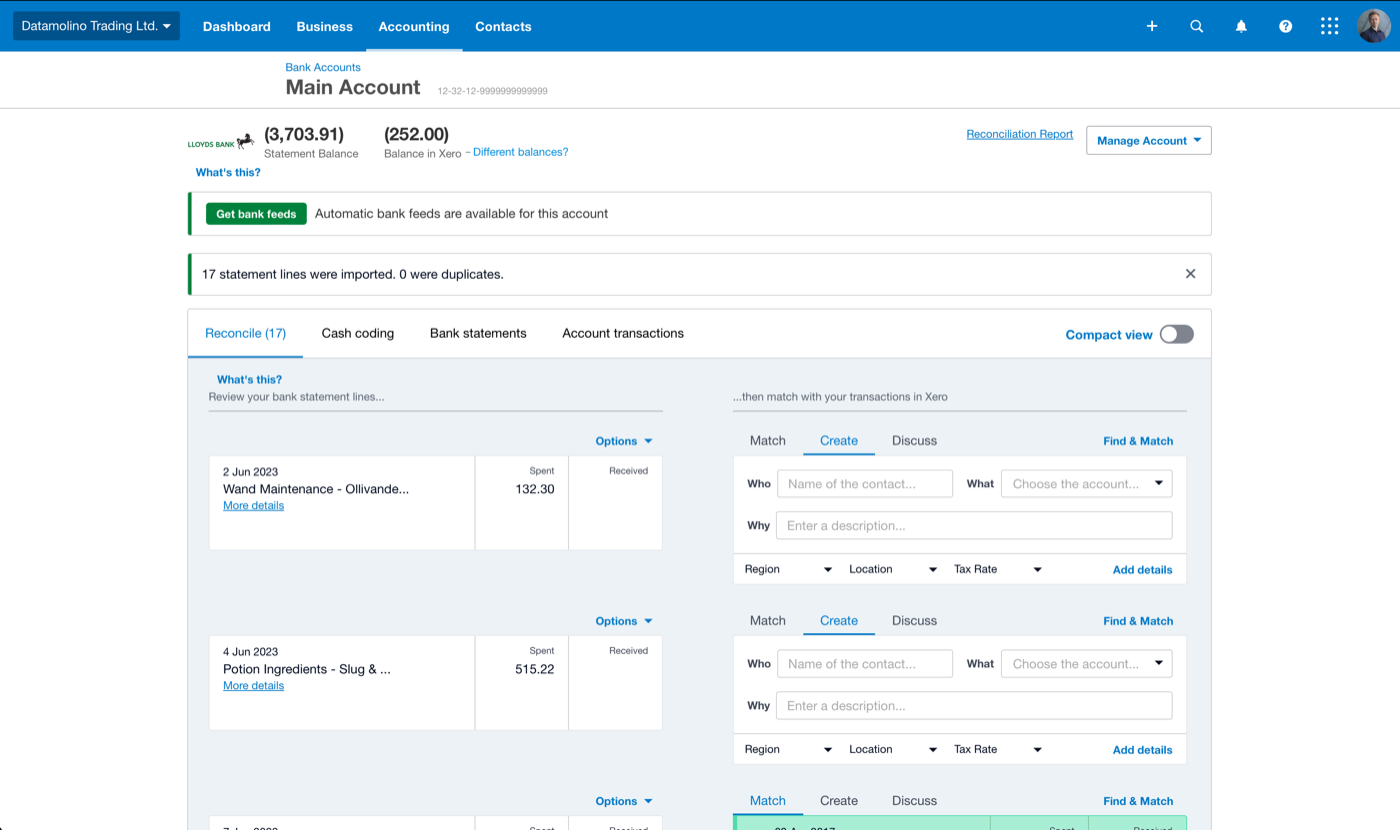
Reconcile imported transactions

After importing, navigate to the bank account and open the Reconcile tab. Xero displays the imported transactions alongside suggested matches from your invoices, bills, and existing records. Match each transaction to the correct account or contact, or create new transactions as needed.

Tip: If you included precoded fields (AccountCode, TaxType, ContactName) in your CSV, Xero will pre-populate the categorization, significantly speeding up reconciliation.
Xero bank account Reconcile tab showing imported statement lines on the left with dates, descriptions, and amounts, and matching options on the right with Match, Create, and Discuss tabs for each transaction
The Reconcile tab displays imported transactions ready to be matched against invoices, bills, or new entries.

Required Xero Fields

Field Type Description Example
Date Date Transaction date (DD/MM/YYYY or MM/DD/YYYY) 14/01/2026
Amount Currency Amount (positive=received, negative=paid) 97.25

Xero requires these fields for successful import.

Tip Make sure your converted file is saved and ready before starting the import. You can preview the converted data in the tool before downloading.

Frequently Asked Questions

Xero accepts CSV files for importing bank statement. Our converter ensures the file is formatted correctly for Xero.
Check the error message from the platform. Common issues include date format mismatches, missing required fields, or duplicate entries. Our converter handles most formatting issues automatically.